

Ontem à noite fiz mais uma coroa de Natal com material que recolhi no jardim e pensei que seria interessante partilhar o processo convosco. Há muitas maneiras de fazer coroas - esta é apenas uma das técnicas possíveis.
Yesterday evening I made another Christmas wreath with material from the garden and I thought it would be interesting to share the process with you. There are lots of ways in which you can make a wreath - please note that this is just one of them.

1. É importante ter uma superfície de trabalho com algum espaço e que se possa sujar sem problemas (eu cobri a mesa da casa-de-jantar com oleado). Depois há que dispor o material que se pensa usar na coroa, mesmo que se acabe por deixar muita coisa de fora. Se gostar de arranjos simples e naturais, o truque é manter a paleta de cores bastante restrita.
Materiais obrigatórios são: uma coroa de metal com dois aros concêntricos, um rolo de arame fino, arame mais grosso, musgo fresco e folhagem. Depois pode usar bagas, frutos, flores... um simples passeio pelo campo oferece possibilidades ilimitadas.
1. It's important to work on a surface that offers plenty of room and is protected from possible water spillage and dirt (I covered the dining room table with oilcloth). Then you should gather everything that can be used in the wreath, even if in the end you decide to leave some of it out. If you enjoy simple, natural-looking arrangements, the trick is to keep the colour palette quite restricted.
The necessary materials are: a wire wreath base (one with two concentric rings), a spool of fine wire, some thicker wire, fresh moss and foliage. Then you can use berries, fruits, flowers... a simple walk in the countryside will provide you with endless options.

2. Enrole o arame mais fino ao círculo exterior da base da coroa.
2. Wrap the fine wire around the outer circle of the wreath base.

3. Cubra a base com bocados de musgo, enrolando um bocado de cada vez. Sobreponha o musgo ligeiramente e enrole-o com bastante firmeza.
3. Start by binding some pieces of moss using the fine wire, one piece at a time. Slightly overlap the moss and wrap it quite taut.

4. Cubra toda a superfície da coroa de musgo, dando uma segunda volta se necessário.
4. Cover the entire surface of the wreath, and go around again if necessary.

5. Comece a dispôr a folhagem pouco a pouco, enrolando-a com o mesmo arame. Em alternativa, pode cortar bocados de arame mais grosso e torcê-los em forma de U, enterrá-los na base de musgo e dobrar as pontas na parte de trás da coroa.
5. Add little bunches of foliage, one at a time, binding them with that same wire. Alternatively, you can bend lengths of thicker wire into a U-shape and use these wire loops to pin each bunch of foliage to the moss base, twisting the ends of the wire together and tucking them into the back of the wreath.

6. Cubra toda a coroa com folhagem, orientando-a sempre no mesmo sentido.
6. Cover the entire circle with foliage, binding it always in the same direction.


7. Coloque ramos de bagas encarnadas em três pontos equidistantes da coroa, usando bocados de arame em forma de U (v. passo 5).
7. Add either sprigs or small bunches of red berries, in three equidistant spots of the circle, using wire loops (as described in step 5).

8. Verifique se há pontos descompensados na coroa e, caso tal se verifique, acrescente pequenos ramos de folhagem onde forem necessários.
8. If you notice that the wreath is unbalanced in any way, just add one or two bunches of foliage where needed.

9. Na parte detrás da coroa, faça passar uma fita pelo círculo exterior da base de arame e dê um nó no final.
9. On the reverse side of the wreath, insert a piece of ribbon through the outer circle of the ring base and tie a knot at the end.
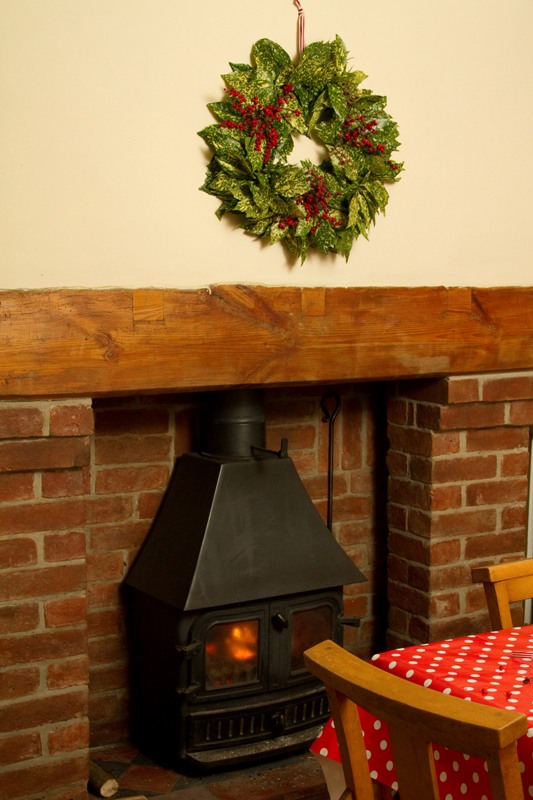
10. Pendure a coroa num prego. Se a pendurar no exterior, a coroa durará várias semanas.
10. Hang the wreath on a nail. If you hang it outside it will keep for several weekes.
10. Hang the wreath on a nail. If you hang it outside it will keep for several weekes.
(images: Tiago Cabral)


Oh, ficou tão linda! E essa lareira é uma delícia!
ReplyDeleteLinda! Gosto emsmo assim. Simples. Encarnado e verde! E a madeira toda que estava ao lado da lareira já foi usada? Ou é outra lareira?
ReplyDeleteMuy buena idea, ¡gracias por el tutorial!
ReplyDeleteMaravilhosa! A coroa e a lareira;)
ReplyDeleteObrigada pela partilha!
Olá Concha,
ReplyDeleteFicou muito bonita, e obrigada por partilhares a forma de a fazer :)
Muito bonito!
ReplyDeleteSó uma observação: dispor e não "dispôr".
TDO QUE VOCE FAZ FICA LINDO TENS UM BOMM GOSTO COMO POUCOS!!
ReplyDeleteADOREI A IDEIA!!
PARABENS.
Hola Concha, gracias por tu visita. Nos encanta la cocina portuguesa y Portugal!!!. Precioso blog. Saludos
ReplyDeleteEstão cada vez mais bonitos os arranjos florais! ;)
ReplyDeleteLinda!
ReplyDeleteDeclaro-me CONCHAMANIACA.. jejejejejeje.. Lindo.
ReplyDeleteEstá linda!
ReplyDeleteVi uma feita com hera e malaguetas! Ficou muito gira.
xx
Very linda... Thank you for sharing the hole process!
ReplyDeleteFeita assim com capricho, ficou mesmo linda! A natureza sempre nos oferece tudo o que precisamos, por isso é que devemos trata-la com todo o carinho! Beijos.
ReplyDeleteLovely wreath! I've been making some last days...
ReplyDeleteC'est très beau.
ReplyDeleteTu as de grandes qualités pour la décoration. j'aime beaucoup tout ce que tu montres sur ton blog.
A bientôt.
Antonella (St raphaël, south of France)
Ficou muito linda!! E ´tão bem explicada... adorei!
ReplyDeleteGrande abraço
Wow! Beauitul but it's a pity one doesn't get to see all the pretty moss!
ReplyDeleteI absolutely love your blog and everything on it. A wonderfully creative place to visit.
ReplyDeleteFantástica!!! Adorei! E se a fores borrifando de vez em quando na parte do musgo, com água, se calhar tb se aguenta bastante!
ReplyDeleteBeijinhos
Tudo o que tem o teu toque fica perfeito!!!!
ReplyDeleteObrigada por partilhares, Concha!