Showing posts with label food. Show all posts

16 March 2015

Bolachas Sem Glúten :: Gluten-Free Biscuits


No mês passado fui passar uma manhã a casa de uma amiga. Como não gosto de aparecer em casa de alguém de mãos a abanar, resolvi levar-lhe umas bolachas. No entanto, a minha escolha de bolachas estava limitada por um factor importante: esta minha amiga não come coisas com glúten. 

Na minha pesquisa online de receitas de bolachas sem glúten, apareceram-me muitas hipóteses com ingredientes estranhos e difíceis de encontrar. Mas não era nada daquilo que eu estava à procura... não me apetecia nada fazer uma receita cheia de substituições — queria simplesmente umas bolachas simples e honestas. A verdade é que cá em casa temos a sorte de não nos termos de preocupar com restrições alimentares (pelo menos por enquanto), por isso toda a ciência por trás das substituições ultrapassa-me... mas conheço um caso grave e nem imagino como deverá ser difícil ter de lidar com alergias perigosas diariamente.

A certa altura deparei-me com esta receita da Martha Stewart. Foi perfeita para a ocasião porque não utiliza farinha de trigo, só aveia, e as bolachas são deliciosas. Deixei de fora as passas e o extracto de baunilha e certifiquei-me de que as bolachas ficaram bem cozidas antes de as tirar do forno (eu normalmente tenho tendência para cozer de menos as bolachas, porque gosto delas relativamente moles, mas estas desfazem-se se não ficarem bem cozidas). 

Na semana passada voltei a fazê-las, desta vez para uma senhora que está muito doente. E, mais uma vez, apercebi-me da razão pela qual gosto tanto de oferecer coisas feitas em casa. Há um envolvimento e um empenho dificilmente equiparáveis ao acto de comprar algo já feito. Claro que não temos necessariamente de fazer bolachas — pode ser uma carta, um desenho, um ramo de flores, uma almofada de alfazema. Ao oferecermos algo feito por nós, estamos a oferecer uma pequena parte de nós próprios. E é isso que torna o presente tão especial.


Last month I spent a morning at a friend's house. Since I don't like showing up at someone's door without something on my hands, I thought I'd bake her some biscuits. However, my choice of biscuits was limited by a very important factor: my friend doesn't eat gluten.

While I was searching online for a gluten-free recipe, I stumbled upon many options with strange or hard to find ingredients. But that wasn't what I was looking for. I didn't want a recipe full of substitutions — I just wanted to bake simple, honest biscuits. In our family we're incredibly lucky not to have to deal with any allergies (at least for now) so the whole science behind substituting ingredients is very foreign to me... but I do know of one serious case and I can't even imagine what it must be like to have to deal with dangerous allergies everyday.

Eventually I came across this Martha Stewart recipe. These cookies are wonderful! I left out both the raisins and the vanilla extract and I made sure the cookies were fully cooked before I took them out of the oven (usually I tend to under-bake cookies because I like them on the softer side but these are too crumbly if they're not well done).

Last week I made them again, this time for a lady who is very sick. And I found myself reflecting once again on why I love giving away homemade things. When we make something for someone with our own hands, there's a special involvement and effort that are hard to compare with something bought in a shop. Of course you don't have to bake if you're not into that —you can write a letter, make a drawing, put together a simple bouquet of flowers, sew a little lavender sachet. When you give away something made with your own hands, you're of giving away a small part of yourself. And that's what makes it so special.

26 February 2015

Comidas e Bebidas Infantis :: Kids' Party Food and Drink


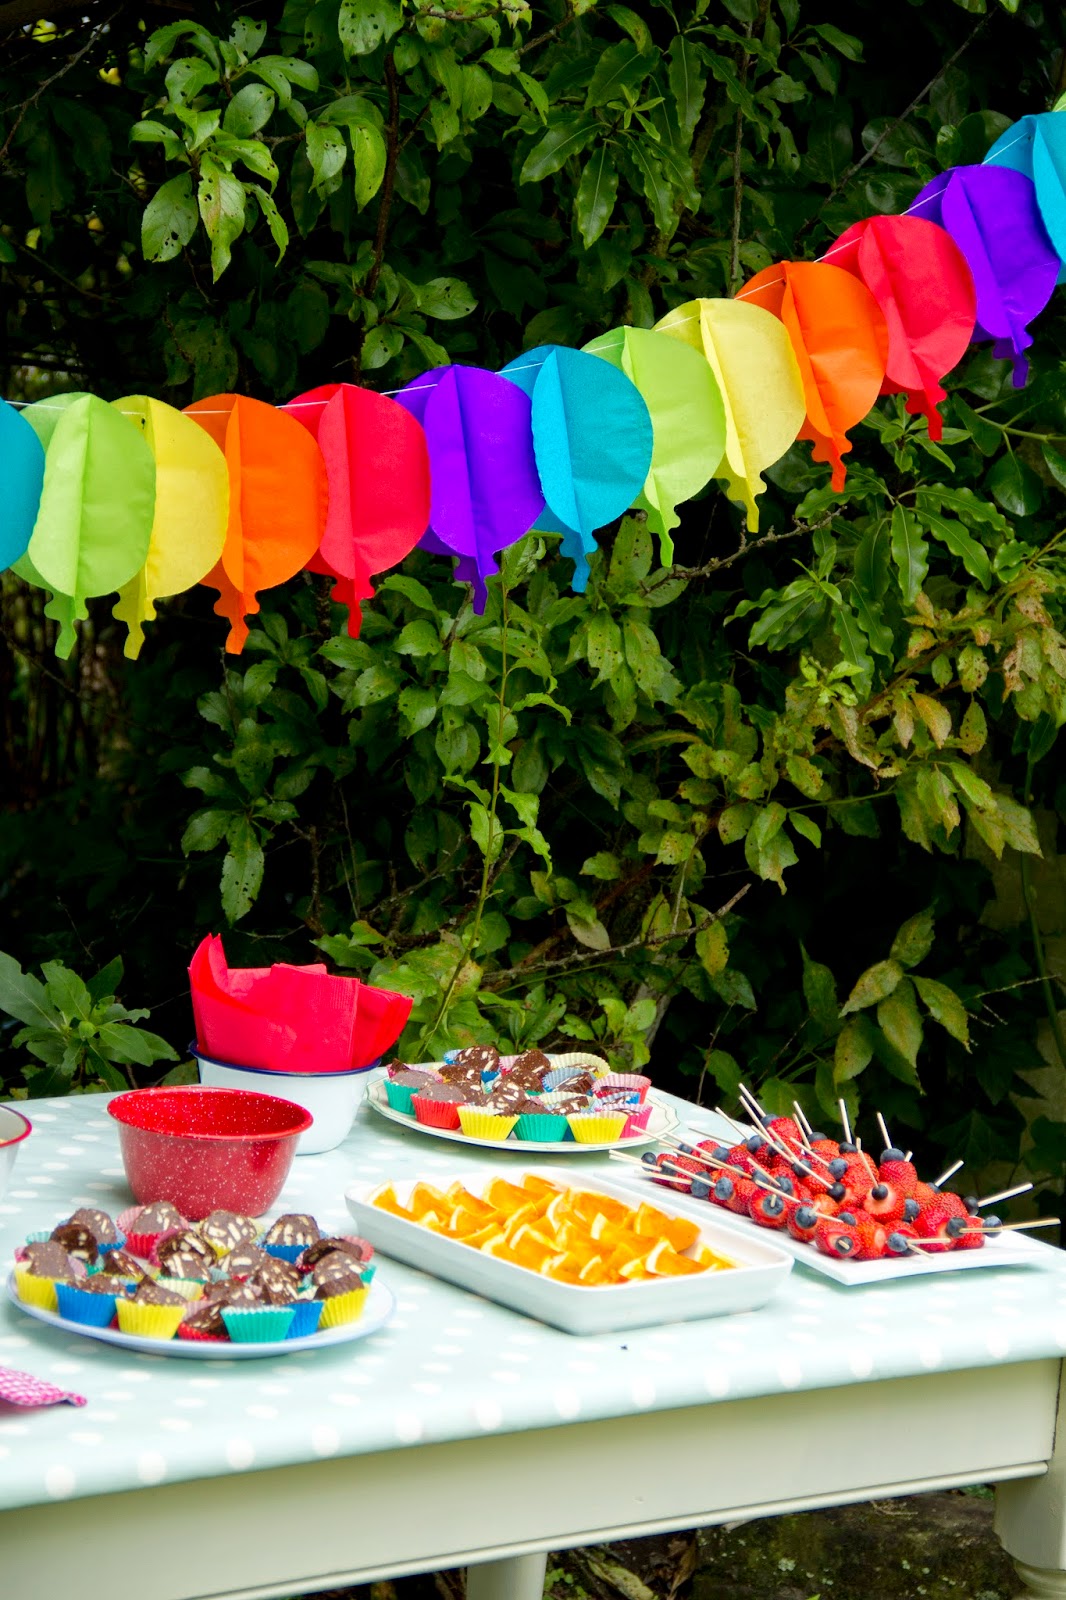
No meu último post contei-vos como montei a festa do Rodrigo, hoje vou falar-vos na comida. Devo dizer que, no que toca a festas infantis, eu parei nos anos 80. Não há grandes sofisticações por aqui — as minhas escolhas recaíram em memórias de infância e em sugestões de algumas amigas sensatas com filhos mais velhos que os meus, bem como naquilo que o Rodrigo me pediu. A saber:

- sanduíches de queijo: como cá não há daquelas bolinhas enfarinhadas óptimas, usei pão de forma e cortei as sanduíches com um cortador de bolachas em forma de flor;

- salame de chocolate (uma iguaria desconhecida aqui na NZ): em vez de fazer um rolo grande, fiz três pequenos, que depois cortei em rodelas e servi em cima de formas de papel (segui esta receita com pequenas alterações);

- bolachas em forma de número 3: experimentei uma receita nova de bolachas de manteiga e gostei mais desta do que daquela que usei para as bolachas de Natal. Como cobertura, fiz uma pasta de icing sugar e água e depois salpiquei-as com sprinkles coloridos.

- espetadas de morangos e mirtilos;

- quartos de gelatina de laranja: o grande clássico das festas infantis dos anos 80. Lembram-se disto? A minha mãe fazia-os sempre. Cortam-se as laranjas ao meio e, depois de espremidas, enchem-se com gelatina acabada de fazer. Põem-se no frigorífico e, no dia seguinte, cortam-se aos quartos usando uma faca bem afiada. Na semana anterior à festa experimentei fazer uma versão mais saudável com sumo de laranja e gelatina natural em pó (cá não há folhas) e ficou horrível (juro que sabia a bife), por isso acabei por usar gelatina de pacote;

- uma taça de smarties;

- sumo de laranja (feito com todas aquelas laranjas que espremi para fazer os quartos de gelatina);

- sumo de melancia e framboesa (receita deste livro — obrigada, Soraia, pela sugestão);

- água.

Para a festa cá em casa, o Rodrigo pediu-me um "bolo amarelo com morangos", por isso fiz-lhe um pão-de-ló coberto com chantilly caseiro e morangos. Mas quem escolheu o bolo para levar para a escola fui eu! Fiz-lhe um bolo de chocolate e laranja numa forma que aluguei na padaria aqui da vila, e depois cobri-o com smarties (a ideia veio daqui). Segui esta receita mas acrescentei mais duas ou três colheres de sopa de icing sugar à cobertura, de maneira a torná-la mais espessa (para que os smarties se aguentassem no sítio).


OK, so I've told you about Rodrigo's party set up — now let's hear about the food and drink! I must say that when it comes to children's parties, I'm proudly stuck in the 80s. There are no elaborate affairs around here — I based my choices on childhood memories and suggestions given to me by no-nonsense friends who have older kids, as well as Rodrigo's requests. Here goes:

- cheese sandwiches: just sliced bread and cheese, which we then cut out using a flower shaped cookie cutter; 

- chocolate salami: this is a childhood staple in Portugal — you make a dough using powdered chocolate, egg yolks, sugar and Marie biscuits, you shape it like a log before putting it in the fridge for at least 12 hours and then you slice it up. I made 3 slim logs instead of a thick one and placed each small rounded slice on a mini muffin paper case;

- number 3 biscuits: I tried out a new recipe for sugar biscuits and liked it much more than the one I used for my Christmas biscuits. I iced them with a simple paste of icing sugar and water and then we scattered lots of colourful sprinkles on top.

- strawberry and blueberry skewers;

- orange jelly quarters: this was a great classic in Portuguese kids' parties back in the 80s. My mother always made them! You cut the oranges in half, squeeze out the juice and then fill the empty shells with hot orange jelly. Then they go in the fridge to set and the following day you slice them up into quarters. A few days before the party I made a trial run with a healthy version of the jelly (real orange juice and powdered unflavoured gelatine — I couldn't find any gelatine leaves) and it turned out absolutely revolting (it literally tasted like beef), so I just went with the packaged stuff instead [jell-o].

- a bowl of smarties;

- orange juice (from all those oranges I used for the jelly quarters);

- watermelon and raspberry juice (recipe from this book — thank you, Soraia, for the suggestion);

- water.

Rodrigo asked for a "yellow cake with strawberries" so I made him pão-de-ló (Portuguese sponge cake) covered with whipped cream and topped with a handful of strawberries. However, the cake he took to preschool was chosen by me... and I went to town with it! Inspired by this cake, I rented a number 3 tin from our local bakery and baked a chocolate and orange cake, which I then covered in smarties. I followed this recipe but added another 2 or 3 tablespoons of icing sugar to the chocolate topping (in order to make it thicker so that the smarties would stick properly to the cake).

(photos: © Constança Cabral)

23 February 2015

Festa dos 3 Anos :: 3rd Birthday Party


Para a festa dos 3 anos do Rodrigo fiz um pequeno arraial aqui no nosso jardim. O tempo não estava nada de especial — se tivesse sido em Portugal, acho que nunca teria feito a festa lá fora, mas visto que estes kiwis são bastante mais resistentes ao vento e às temperaturas baixas do que nós portugueses, resolvi arriscar e acabei por não me arrepender. As crianças divertem-se sempre muito mais fora de casa, não acham?

O nosso jardim é a descer e tem vários patamares. No primeiro criei um recanto com colchões, almofadas, poufs, um tapete e alguns brinquedos e livros. No patamar seguinte coloquei duas mesas, uma com comida e a outra com bebidas (amanhã mostro-vos os comes e bebes em pormenor). As decorações de papel são todas portuguesas (as mesmas que usei quando fiz um Santo António dentro de casa, lembram-se?).

Foi uma festa bastante simples mas muito colorida, com tudo feito em casa conforme os gostos e pedidos do Rodrigo. Ele estava entusiasmadíssimo e fartou-se de ajudar, gostei imenso de assistir à alegria e ao empenho dele. Para o ano há mais!


Rodrigo's 3rd birthday party was a Portuguese-inspired garden party at home. The weather wasn't great — had this been in Portugal I would never had set up everything outside but since Kiwis are much more tolerant of wind and low temperatures than us Portuguese, I decided to risk it and I'm so glad I did. Children always have more fun outdoors, don't you think?

Our garden is on a slope and it has different levels. On the first level I created a sitting and playing area with a couple of mattresses, some cushions, bean bags, a rug and a few toys and books. On the next level I placed two tables with food and drinks (I'll tell you more about that tomorrow). The paper decorations are all Portuguese (the same ones I used when I once celebrated St. Anthony's day indoors, do you remember?).

It was a simple affair but a colourful one. I made everything according with Rodrigo's tastes and requests, he was so excited! He was so helpful, committed and happy, it was truly lovely to watch. 

(photos: © Constança Cabral)

18 December 2014

Biscoitos de Natal :: Christmas Biscuits


O Rodrigo gosta muito de brincar com as formas das bolachas e andava há que tempos a pedir-me para as pormos a uso. Andei à procura de receitas com massa boa para cortar com formas (nem todas resultam bem, sobretudo depois de cozidas) e acabei por experimentar esta da Nigella. Ela própria comenta que é difícil encontrar uma receita que resulte em bolachas simultaneamente firmes e saborosas... e a verdade é que estas não sabem a muito. Não são enjoativas (algumas receitas deste género sabem demasiado a farinha ou a manteiga), mas ficariam melhores com um bocado de raspa de limão ou de laranja.

Quando as bolachas saíram do forno, furei-as com uma palhinha. Depois de frias, o Rodrigo e eu decorámo-las com uma pasta de icing sugar e água. Por fim, passei um cordel encarnado e branco para as poder pendurar na árvore... mas acabei por não conseguir pendurar nenhuma porque desapareceram num instante!


Rodrigo enjoys playing with the biscuit cutters we've got lying around the kitchen and keeps asking me to use them. I went looking for a good recipe for butter cut-out biscuits and ended up using this one by Nigella. As she says, it's hard to find a recipe that produces both tasty and perfectly formed biscuits... and I must say these are a bit bland. They're not too floury or buttery, I'll admit to that, but I think they could be improved by adding a bit of lemon or orange zest to the batter.

When the biscuits came out of the oven I made one hole in each using a paper straw. Once they had cooled down, Rodrigo and I decorated them with a mixture of icing sugar and water. Then I threaded them with string so that we could hang them on the tree... but that never happened because the biscuits were gone in a flash!

(photos: © Constança Cabral)

27 August 2014

Friands de Mirtilo :: Blueberry Friands


Nunca vi tantos muffins e friands à venda em cafés como aqui na Nova Zelândia. Para mim, os friands foram novidade: feitos com miolo de amêndoa, claras de ovo e fruta, são uns bolinhos óptimos para comer a meio da manhã ou ao lanche.

Na sexta-feira à tarde o Rodrigo e eu fizemos friands cá em casa. A minha mãe tinha feito leite-creme no dia anterior e assim aproveitámos as claras. Seguimos esta receita da Donna Hay mas substituímos as framboesas por mirtilos (congelados). O Rodrigo adorou fazê-los — podem vê-lo todo contente aqui em baixo — e fartou-se de comer massa crua, mas quando saíram do forno nem os quis provar... Os adultos cá de casa, porém, gostaram muito. Experimentem que vale a pena!


[usei uma forma própria para friands mas as formas de queques também servem perfeitamente]


Never before had I seen so many muffins and friands available in coffee shops... they're a thing here in NZ. Friands were new to me: made with almond meal, egg whites and fruit, they're the perfect little cakes for your morning or afternoon tea.

Last Friday Rodrigo and I made friands at home. We followed this Donna Hay recipe but used (frozen) blueberries instead of raspberries. Rodrigo loved making them — you can see him having fun in the picture below — and ate lots of batter but strangely wasn't tempted to try them once they were baked. Us adults, however, loved them. Give them a try. they're well worth it!

[I used a special friand tin but if you don't have one, any muffin tin will do]


(photos© Constança Cabral)

23 July 2014

Porridge e Puré de Maçã na Bimby :: Thermomix Porridge and Apple Sauce


Há uns anos tive a sorte de receber a Bimby como presente e não há dúvida de que dá muito jeito no dia-a-dia, especialmente para pessoas que, tal como eu, detestam ficar horas em frente ao fogão (por isso é que gosto tanto de fazer bolos). Vou poupar-vos a uma prelecção sobre todas as vantagens da máquina mas não queria deixar de falar-vos em duas coisas que faço para o Rodrigo praticamente todas as semanas: porridge (papas de aveia) e puré de maçã. São tão simples que hesitei várias vezes em partilhá-las no blog, mas como talvez as achem úteis, aqui vão elas.

A few years ago I was lucky enough to receive a Thermomix as a birthday present. This appliance is incredibly popular in Portugal and can be a great help in the kitchen, especially for people who, like me, don't particularly enjoy spending hours in front of the stove (that's why I love baking so much). I'm going to spare you from a detailed lecture about all its wonders — instead I'll tell you about two things I cook in it for Rodrigo nearly every week: porridge and apple sauce. Because they are so simple I've hesitated to share them on the blog... but you might find them useful, so here goes.


Comecemos pelo porridge. Ao contrário do que acontece em Portugal, tanto em Inglaterra como na NZ não há grande variedade de papas infantis. Em Inglaterra ainda havia uma ou duas hipóteses decentes (e felizmente com muito menos açúcar do que Nestum ou Cerelac), mas na NZ só há uma e é bastante duvidosa. Como felizmente o Rodrigo não é alérgico ao glúten, desde os 6 meses que lhe dou porridge e hoje em dia é isso que ele come todos os dias ao pequeno-almoço.

Faço uma dose bastante generosa que costuma durar 5 ou 6 dias no frigorífico — de manhã encho uma taça com papa e aqueço-a um minuto no microondas (o suficiente para deixar de estar gelada). Depois adiciono sempre um bocado de mel ou puré de fruta (o porridge sozinho é algo sensaborão).

Eis a minha receita (adaptada do livro britânico da Bimby):

Porridge
100 g de flocos de aveia 
1300 g de leite gordo 
15 minutos / 90ºC / velocidade 4 

A receita original usa 600 g de leite mas a papa fica grossíssima, por isso fui experimentando com diferentes quantidades e cheguei à conclusão que 1300 g são ideais para mim. No momento em que sai da Bimby parece muito líquida, mas quando arrefece engrossa bastante.


Let's start with porridge then (a warning for all of you natives from the British Isles: do not read this). Little children in Portugal tend to eat a sort of mashed, sugary cereal for breakfast until they're old enough to make do with bread and butter and a glass of cold milk. This means that in Portugal there's a huge variety of baby cereal on the market (some people continue to have it for breakfast well into adulthood); however, this isn't the case in the UK and in NZ. In the UK I could still find one or two decent options (thankfully they were much healthier than the Portuguese versions) but in NZ there's only one and quite frankly, it smells funny. Given the fact that Rodrigo isn't gluten intolerant, he's been eating porridge since he was 6 months old — in fact, this is what he eats for breakfast every single day.

I make a big batch at the beginning of the week and it usually lasts for 5 or 6 days in the fridge — every morning I fill up a bowl and reheat it for one minute in the microwave (just enough to warm it up a bit). I then throw in some honey or a spoonful of fruit purée.

Here's my recipe (adapted from the UK edition of the Thermomix recipe book):

Porridge
100 g of old-fashioned rolled oats
1300 g of full-fat milk
15 minutes / 90ºC / speed 4 

The original recipe called for 600 g of milk but the porridge turned out much too thick for my taste so I kept experimenting and eventually came up with 1300 g. When you tip it out of the Thermomix it looks horribly thin but as it cools down it thickens quite a lot.


Passemos agora ao puré de maçã, uma sobremesa que adoro desde pequena... para mim, ocupa aquele espaço entre fruta fresca e doce de colher. Eis a minha receita:

Puré de maçã
encher a Bimby com maçãs descascadas e cortadas aos bocados (às vezes acrescento uma ou duas pêras)
30 minutos / 100ºC / velocidade 1
2 minutos / velocidade 9

Não leva água nem açúcar e fica com uma consistência excelente!


Now onto apple sauce, the sort of dessert I've loved ever since I was a little girl... for me it fills that gap between fresh fruit and a proper pudding. Here's my recipe:

Apple Sauce
fill the Thermomix with peeled apples cut into chunks (I sometimes add one or two pears)
30 minutes / 100ºC / speed 1
2 minutes / speed 2

No need to add any water or sugar!

(photos© Constança Cabral)

02 July 2014

Pão Integral :: Wholemeal Bread


O pão que comemos cá em casa é feito por mim, porque o pão de supermercado não me sabe a nada e infelizmente não há boas padarias aqui nas redondezas. Ao longo dos anos, tenho experimentado algumas receitas mas acabo por repetir quase sempre esta. Até que, na semana passada, dei por mim a folhear novamente o "The Great British Book of Baking" e decidi experimentar o "Grant Loaf", uma receita de pão integral que surgiu no Reino Unido durante a Segunda Guerra Mundial. 

Confesso que comecei por desconfiar de um pão feito apenas com farinha integral (normalmente ficam a saber a cartão) mas ainda bem que segui em frente! Digo-vos que o resultado é delicioso, especialmente em forma de torradas com manteiga. Para quem não tem o livro, a receita pode ser encontrada aqui. Experimentem!


I bake our own bread mainly for two reasons: first, because I find supermarket bread utterly tasteless and also because we don't have access to any good bakeries locally. Over the years I've played around with a few bread recipes but I always come back to this one. However, last week I was browsing through the "The Great British Book of Baking" and stumbled upon the Grant Loaf, a recipe for wholemeal bread that was first published in the UK during the World War II.

I admit that at first I was a bit suspicious of a loaf made entirely with wholemeal flour (they do have a tendency for tasting like cardboard) but I'm glad I went ahead with it anyway! This bread is delicious and makes excellent (buttered) toast. If you don't own this book, you can find the recipe here. Do give it a try!

(photo© Constança Cabral)

23 May 2014

Granola


Há uns anos falei-vos na granola que faço cá em casa. Na altura não partilhei a receita, porque tenho sempre algum pudor em publicar no blog receitas de livros (e muitas dúvidas acerca de temas como autorizações e direitos de autor). Mas, quando há uns dias voltei a fazer granola (depois de mais de um ano de intervalo), apercebi-me de que tenho feito bastantes adaptações à receita original... por isso hoje deixo-vos aqui a minha versão de granola caseira:

Granola (receita adaptada do livro "Gifts from the Kitchen", de Annie Rigg)

400 g de aveia
100 g de amêndoas
100 g de nozes
100 g de sementes de girassol
100 g de sementes de abóbora
50 g de sementes de sésamo
4 colheres de sopa de óleo de girassol
300 g de mel

1. Aquecer o forno a 180ºC.

2. Cortar as amêndoas e as nozes em bocados.

3. Juntar as amêndoas, as nozes, a aveia e todas as sementes numa taça grande. Mexer, para que fique tudo bem distribuído.

4. Num púcaro/pequeno tacho, aquecer um pouco o mel e o óleo, sem deixar que levante fervura.

5. Deitar a mistura do mel e do óleo na taça e envolver bem com uma colher de pau.

6. Forrar um tabuleiro grande com papel vegetal e deitar lá para dentro o misturado. 

7. Colocar no forno e vigiar como um falcão! Dependendo dos fornos, a granola estará pronta ao fim de 20-30 minutos, mas aproximadamente de 5 em 5 minutos terá de ser mexida com a colher de pau, para que fique tostada uniformemente (acreditem em mim... já a deixei queimar umas vezes!). Retirar do forno assim que estiver toda dourada.

8. Deixar arrefecer e colocar dentro de um frasco ou de uma lata/caixa de folha.

Eu gosto de comer granola com iogurte natural e (às vezes) raspas de chocolate preto... é perfeito a meio da manhã ou ao lanche!


A few years ago I showed you my homemade granola. At the time I didn't share the recipe for it because I'm always a bit reluctant to post recipes from books on my blog as I worry about things like asking permission and copyright issues. However, when I made granola again a couple of days ago I realised that I've been adapting the recipe quite a bit over the years... so here's my version:

Granola (recipe adapted from the book "Gifts from the Kitchen" by Annie Rigg)

400 g rolled oats
100 g almonds
100 g hazelnuts
100 g pumpkin seeds
100 g sunflower seeds
50 g sesame seeds
4 tablespoons sunflower oil
300 g runny honey

1. Preheat the oven to 180ºC.

2. Roughly chop the almonds and hazelnuts.

3. In a large mixing bowl, combine the almonds, hazelnuts, oats and all the seeds. Mix until combined.

4. Heat the sunflower oil and the honey in a small pan. Be careful not to let it start boiling.

5. Pour that mixture into the mixing bowl and stir with a wooden spoon.

6. Cover a large roasting tin with a sheet of baking paper and tip the granola into it.

7. Place the tin in the oven and watch it like a hawk! It'll need to cook for about 20-30 minutes, depending on the oven you're using, but you'll have to stir it every 5 minutes or so to ensure that everything is browning evenly (I've let it burn a few times before so trust me on this!). Remove from the oven once it's all golden.

8. Leave to cool completely and then place it inside a glass jar or tin.

I like eating it over natural yoghurt as a mid-morning or afternoon snack... sometimes I'll throw in some dark chocolate chips to spice it up a bit!

(photos© Constança Cabral)

02 May 2014

Outrageous Chocolate Cookies


Apesar da onda de batidos verdes que assola a internet (eu estou cada vez mais curiosa, mas ainda não tive coragem para aderir à loucura), cá em casa continuo a fazer muitos doces, daqueles cheios de glúten, açúcar refinado e manteiga*. A maior parte das experiências não chega a ver a luz do dia aqui no blog — só quero partilhar convosco receitas realmente deliciosas — mas tenho que deixar aqui uma menção a estas bolachas de chocolate da Martha Stewart. São decadentes e absolutamente viciantes, com uma textura quase de brownie. Usei uma mistura de chocolate preto e Green & Black's Maya Gold (laranja e especiarias) porque era aquilo que havia na minha despensa, e acho que vou voltar a usar esta combinação! Experimentem fazê-las: a receita está aqui.

* temos a sorte de não haver alergias alimentares cá em casa... quanto a dietas, pensaremos nisso daqui a uns meses.


Despite the current green juice mania (I'm getting increasingly curious but I'm still lacking the moral and physical courage to join in), I keep on baking a lot of things that are packed with gluten, refined sugar and butter*. Most of my experiments never see the light of day here on the blog — I've pledged to only share delicious recipes with you — but I feel I must mention these Martha Stewart chocolate cookies. They're decadent and highly addictive, almost brownie-like. I used a mixture of dark chocolate and Green & Black's Maya Gold (hints of orange and spices) because that was all I had in the cupboard and I like this combination! Here's the recipe in case you want to try them.

* we're lucky enough not to have any food allergies in our family... as for dieting, I'll think about that in a few months' time.

(photo© Constança Cabral)

30 January 2014

Dia-a-Dia :: Everyday Life


Confesso que não sou daquelas mães com imensas ideias para actividades originais e ultra-didácticas para as crianças. Mas gosto de envolver o Rodrigo nas tarefas do dia-a-dia: fazer pão e bolos, tirar a loiça da máquina, regar o jardim, arrancar papel de parede... 

Claro que há imprevistos (como, por exemplo, quando ele arranca uma planta ou lambe a tarteira acabada de untar), fica sempre tudo caótico e as operações levam o dobro do tempo. Mas para mim isto é que faz sentido! Não há receitas perfeitas para criar os filhos e, no meu caso, quanto mais o Rodrigo cresce, mais fácil (e giro) o dia-a-dia se torna. Veremos como será com um bebé à mistura!


I confess I'm not one of those mothers that are always producing lots of original and super didactic activities for their children. But I like involving Rodrigo in daily chores: making bread and cakes, unloading the dishwasher, watering the garden, ripping out wallpaper...

Of course this creates chaos, he'll often do unpredictable things (like pulling out a plant or licking a buttered pie dish) and tasks will take much longer to complete. But it makes sense to me! There are no perfect recipes for parenting and, in my case, it's getting easier (and more fun) the more he grows up. Let's see how things will work out with a baby on top of all this!

(photos© Constança Cabral)

23 June 2013

À Escala :: A Matter of Scale


Um bolo grande para nós, um bolo pequeno para ele. À escala, pois claro!

(o bolo de iogurte e limão é um bolo bom, fácil e versátil que faço muitas vezes — ver aqui, por exemplo —; a receita vem neste livro)


A large cake for us, a small cake for him. A matter of scale, indeed!

(I make this lemon and yoghurt cake a lot because it's easy, it tastes good and it's quite versatile — see here, for example —; the recipe comes from this book)

(photo: © Constança Cabral)

21 May 2013

Madalenas Mergulhadas em Chocolate :: Chocolate Dipped Madeleines


Há uns tempos demos um jantar cá em casa e lembrei-me de fazer madalenas para oferecer com o café. Usei a minha receita como base, mas fiz algumas alterações: substituí a raspa de limão por laranja e, em vez de polvilhá-las com icing sugar, resolvi mergulhá-las em chocolate preto.

O chocolate que uso para cozinhar é exactamente o mesmo que gosto de comer no dia-a-dia — com isto quero dizer que não utilizo chocolate de culinária género Pantagruel nos meus bolos e sobremesas. (Chocolates de luxo são outro assunto — hoje estou a falar do chocolate que como diariamente.) Isto não é uma questão de snobeira, mas sim de gosto: quanto melhores os ingredientes, melhor o produto final. As marcas que prefiro variam conforme o país onde estou: em Inglaterra e aqui na NZ uso Green & Black's 70% Cocoa (o Maya Gold também é óptimo), na Bélgica adoro o Côte d'Or Fondant Puur e em Portugal compro o melhor chocolate preto que houver nas prateleiras do supermercado (imagino que já haja mais variedade do que há 3 ou 4 anos por isso não vou indicar marcas).

Agora, nem toda a gente gosta de chocolate preto. É intenso e ligeiramente amargo, sim. E não é muito doce. Daí a reacção do Rodrigo às madalenas: entusiasmo inicial, surpresa quando deu a primeira dentada e decepção no final. Mas nós adultos adorámos!


Some weeks ago we gave a dinner party and I decided to bake madeleines to offer along with coffee. I used my basic recipe but made a few alterations: I substituted grated lemon rind for orange and instead of dusting them with icing sugar, I dipped them in dark chocolate.

The chocolate I use in the kitchen is exactly the same one I eat — by this I mean that I don't buy cooking chocolate. (Luxury chocolate is a whole different ball game — today I'm talking about everyday chocolate.) This isn't a question of snobbery, it's simply a matter of taste: the better the ingredients, the better the outcome. The brands of chocolate I prefer depend on the country I'm in: in England and here in NZ I use Green & Black's 70% Cocoa (Maya Gold is also great), in Belgium I love Côte d'Or Fondant Puur and in Portugal I buy the best I can find on the supermarket shelf. 

Now, not everybody likes dark chocolate. It's intense and a bit bitter. It's not too sweet. Hence Rodrigo's reaction when he tasted the madeleines: he was excited at first, a bit surprised after the first bite and disappointed in the end. But us adults loved them!

(photos: © Constança Cabral)
Related Posts Plugin for WordPress, Blogger...